
Appending text to cells is the act of taking previously entered information and using it with a code to create new information within another part of the Excel sheet. Doing this takes the existing information within an Excel range and adds to it to create the outcome you desire.
Download our example worksheet to follow along.
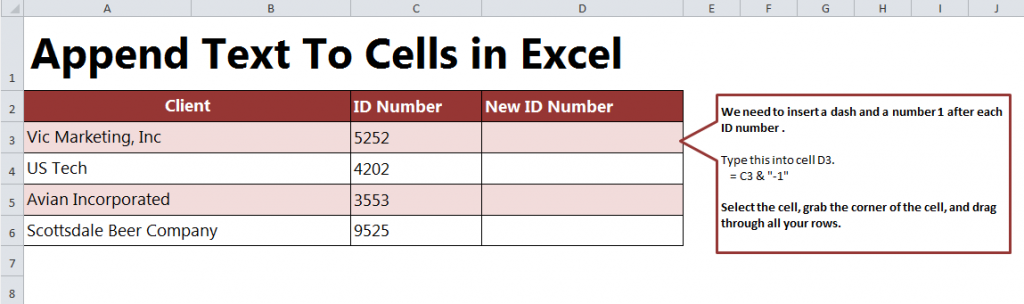
Open the example spreadsheet and you’ll see four clients with corresponding ID numbers. The goal is to create a new ID number for each client using their current ID number.
Follow these steps to append text to cells:
- Select the cell you want to create new content for. In the example, it is cell D3.
- In the selected cell, begin the code with “=” followed by the cell number it will reference. In this case, it is cell C3 which contains the existing ID number you want to alter.
- Close off the D3 entry with “&” followed by “-1”. The -1 is the additional, or appended text, that will be added.
- Once this is entered, you’ll have the appended text in the selected cell.
- Drag the new cell through the rows you want the code applied to, and it will append the text in these cells also.
- You’re finished!
When appending text is used:
- When creating new information en masse for companies with pre-existing information.
- Adding scores or other indication numbers for groups of people.
- Adding sub-text to clarify or further section information. For example, adding “passed”, “failed”, “finished”, “in progress”, etc.
Tip: Use this excel sheet to practice different codes to change the outcome text. For example, changing the “-1” in the example to “abc” or “preferred client”. This downloadable sheet is great for practice or testing before using appended text on your own documents.
Learn more Excel techniques by visiting our Guides section.
Related Templates:
- How to Prepend Text to Cells
- How to Combine Two Names in Excel
- Count Cells in Excel Formula
- Get the Smallest Number in Excel Spreadsheet
- Format Social Security Numbers
View this offer while you wait!